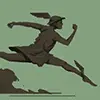
Deadlock Coach데드락 코치
래쉬
높게 뛰어올라 내리치는 일격

래쉬는 적군에게 조금도 숨 쉴 틈을 주지 않습니다. 먼 거리를 날아서 방심하고 있는 적군에게 일격을 가하고 자신을 피해 도망치려는 적군은 끝까지 추격합니다.

래쉬
높게 뛰어올라 내리치는 일격

래쉬는 적군에게 조금도 숨 쉴 틈을 주지 않습니다. 먼 거리를 날아서 방심하고 있는 적군에게 일격을 가하고 자신을 피해 도망치려는 적군은 끝까지 추격합니다.

Description

This is a full engage build and a pretty mobile build. Your sole purpose is to look for engages and be a nuissance that can get away easily while team split pushes.
You're meant to have FUN with this build, keep that in mind.

.divined on discord for any questions

Item Build

early

midgame

usually buy armors later, play off sustain - buy TP early if you're ahead or go PS first and look for engages

Deadlock Item

II

활성 효과

민첩 걸음

use this a lot to get around - buffed recent update good for resistances + mobility

Deadlock Item

III

절대 쿨다운

good for ult since youre playing engage

Deadlock Item

III

활성 효과

시공의 돌

fleetfoot + warp = nightmare fuel for enemy big mo running at them, can use this very well to zone people and then warp stone out

Deadlock Item

II

쾌속 질주

every m/s counts, if you dont sell for scourge later upgrade into juggernaut

Deadlock Item

IV

활성 효과

재앙

really OP for AOE dmg, prefer this if you have a lash or a dynamo or a vortex web on team, sell burst for it

Deadlock Item

IV

활성 효과

유령 타격

your ragebait item, use this to take fliers down & ult and also mid fight to disarm enemy

Deadlock Item

IV

광란

mo go vroom when low hp + buff, skip this if you want to go super duration + scourge

lategame

sop on burrow, sell mystic regen for it - try scourge it's OP (skip frenzy for duration + scourge, sell enduring)

Deadlock Item

III

절대 지속

+1000 dmg on burrow if you buy this since its +2secs

Deadlock Item

IV

마법 증폭 중첩

good synergy with scourge etc

Deadlock Item

IV

거머리

no need to explain but good to survive in ult if you dont want to do divine

Deadlock Item

III

대확장

good if you're going burrow build

Ability Point Order

도발

굴파기

모래 폭풍

콤보

1

2

1

2

5

1

2

5

5

1

2

5